Lens Basics #5: Perspective
“Perspective” in visual arts refers to the perceived distance between objects. It is affected by your choice of lens and other factors. Here’s how you can control it and make your images more impactful.

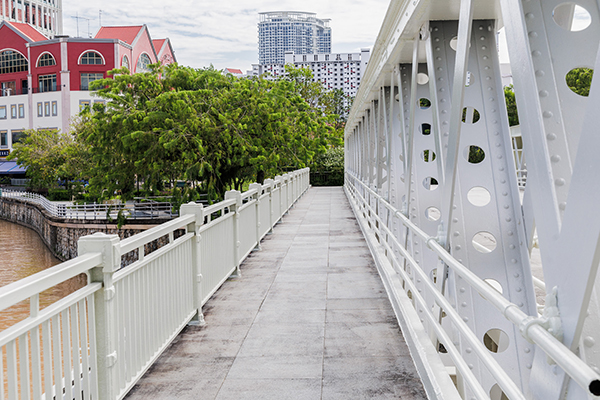
EOS R6 Mark II + RF10-20mm f/4L IS USM @ 10mm, f/8
How to control perspective

Perspective refers to the perceived distance between objects.
When perspective is more obvious, objects that are nearer to us appear bigger, and those that are farther away from us appear smaller. The scene appears to extend deeper into the background (“have more depth”).
With less perspective, the scene appears “flatter”. Objects that are further away look nearer, and distances between them look shorter (“stacked” or “compressed”).
Perspective is influenced by 3 factors: Focal length, shooting distance, and shooting angle.
1. Focal length
Normal (or standard) focal lengths (around 50mm full-frame equivalent) have weak/natural perspective. A shorter focal length exaggerates perspective more; a longer focal length compresses perspective.
2. Distance from subject (shooting distance or "focusing distance")
Perspective is more obvious the nearer the camera to the subject.
3. Shooting angle
Perspective is less obvious when your lens is parallel to your subject. It is more obvious when you shoot at a steeper angle from the subject.
To emphasise perspective:
- Use a wide-angle lens
- Shoot as close to your subject as possible
- Tilt your camera or shoot from an angle.
This helps create images with a strong sense of depth, dimensionality and scale. Combine it with deep focus for better results!
To easily compress perspective:
- Use a super telephoto lens
- Shoot further away from the subject
- Shoot from a flatter angle.
Let’s take a closer look at the 3 factors that affect perspective.
1. Focal length
The images below were shot from the same position, but with different focal lengths. The shorter the focal length, the more the image seems to extend deeper into the distance. This is because of perspective, visible in:
- The space between the vertical bars lining both sides of the path
These look wider in the foreground where they are closest to the camera.
- The leading lines formed by the path
These look at 24mm than at 50mm and 105mm.
Short focal length (24mm)

In the 24mm image, the gaps between the vertical bars closest to us look huge disproportionately large, as though they are slightly stretched, and those further from us look tiny.
Standard focal length (50mm)

At 50mm, there is less of a “stretched” effect at the corners.
Long focal length (105mm)

The vertical bars in the railings on the left and right are so compressed, we can’t see the gaps between them.
All images: EOS R6 Mark II + RF24-105mm f/4L IS USM @ f/8
Further reading:
- What is the difference between a 200mm and 300mm telephoto lens?
- The relationship between lenses and perspective
2. Distance from subject
The examples below were shot using the same focal length (50mm). The entrance to the escalator seems narrow when we’re standing away from it, but once we step under the roof, it doesn’t seem all that narrow any more, doesn’t it! The base of the escalator also seems broader in the “Nearer” example: the glass panes in front seem to open outwards compared to the “Further” shot. This illustrates that perspective is stronger when you’re nearer the subject.
Further (FL: 50mm)

Nearer (FL: 50mm)

Both images: EOS R6 Mark II + RF24-105mm f/4L IS USM @ 50mm, f/8
3. Shooting angle
Head-on vs. diagonal angle
Both shots were taken at 50mm. The head-on shot is flat and does not show any perspective: the windows all look the same distance from the camera. They are the same size and shape, and rectangles appear as rectangles.
The diagonal shot shows perspective: The window closer to us is bigger, and the one further away is smaller. The shapes are also distorted.
Diagonal

Head on

Both images: EOS R6 Mark II + RF24-105mm f/4L IS USM @ 50mm
Eye level vs. low angle (tilted camera)
This is the same escalator in “2. Shooting distance”. See what happens when we shoot from a lower position and angle (tilting the camera upward). The glass panes and the triangle formed by the escalator look broader towards the base and more tapered towards the top in the low-angle shot, showing more obvious perspective.
Eye level (50mm)

Low angle (50mm)

Both images: EOS R6 Mark II + RF24-105mm f/4L IS USM @ 50mm, f/8
Works for high angles too

EOS R6 Mark II + RF10-20mm f/4L IS USM @ 10mm, f/8
The extreme perspective exaggeration of an ultra-wide-angle lens makes these flowers look extra tall.
See for yourself: Shorter focal length+ closer + low angle
The escalator examples were shot at 50mm, which is known for its natural perspective. What happens when we shoot with a wider angle? Here are some 24mm examples of the same scene below—the difference in perspective becomes more pronounced at every step!
Further from subject (24mm)

Further from subject (50mm)

Nearer + eye level (24mm)

Nearer + eye level (50mmm)

Nearer + low angle (24mm)

Nearer + low angle (50mm)

Check out:
Camera Basics #14: Position and Angle
Ideas for using perspective

Keep an eye out for lines
EOS R6 Mark II + RF14-35mm f/4L IS USM
FL: 14mm/ f/4
A stronger perspective emphasises leading lines that you can’t see with your bare eyes!

Make ordinary subjects look interesting
EOS R8 + RF15-35mm f/2.8L IS USM
FL: 15mm/ f/5
Perspective exaggeration makes familiar objects look surreal.
Also see:
Lens Basics #6: Wide-angle Lenses
Ideas for using compression

Make objects look more densely packed
EOS R8 + RF70-200mm f/2.8L IS USM
FL: 200mm/ f/10
Use compression to make objects appear more closely stacked so the scene looks more immersive.

Create a graphical shot
EOS R8 + RF70-200mm f/2.8L IS USM
FL: 147mm/ f/5
Compression’s flattening effect can create a 2D-drawing-like effect that emphasises graphical shapes and patterns.
Also see:
Lens Basics #8: Telephoto Lenses
More tips and inspiration on perspective exaggeration:
Exploring Wide Angle Lenses Part 2: Composition Techniques for Wide-Angle Lenses
Wide-Angle Lens Techniques: Composing Dynamic Portraits at 28mm
24mm Closeups: 3 Simple Exercises for Mastering Wide-Angle Perspective
More tips and inspiration on perspective compression:
Composition Technique: Creating the Illusion of a Larger Moon
Super Telephoto Landscapes: A Mysterious “Cave” in a Moss-Covered Gorge
[Review] RF600mm f/11 IS STM & RF800mm f/11 IS STM in Urban Landscapes


.png)


